Winter Sowing 101: The “New” Method for Winter Gardening

Once the spring bulbs are planted, autumn leaves are raked, dead stems pruned back, and the tools cleaned and put away, there is often a sense of relief for the end of the growing season. It’s just so must work and a break is welcome.
Well…maybe for about a month, then you get the itch to start gardening again.
Gardeners start dreaming of next year’s plants in the depths of winter. Seeds are bought, trays filled with soil, and grow lights are set up to start seeds for spring. But what if you don’t have room for all those trays or grow lights? What if you need a way to start seeds that’s less expensive? And, well, less work?
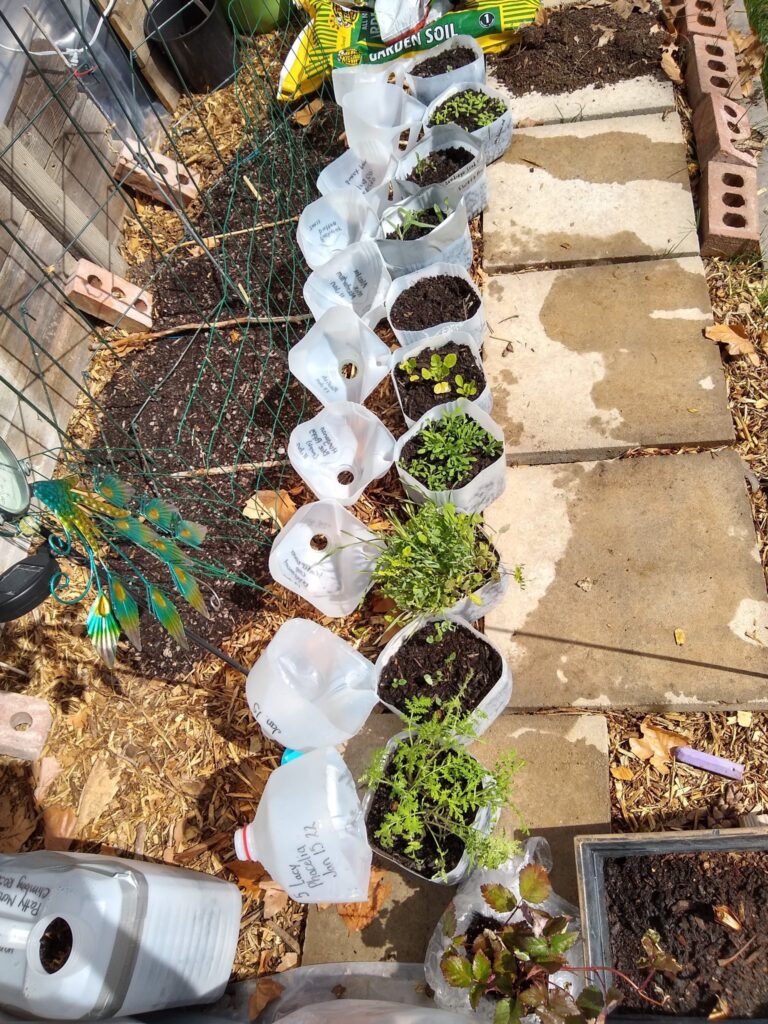
“Winter sowing” is the answer to your cold weather doldrums. Winter sowing is the germination method where you can plant seeds in an enclosed, self-draining container and set outside until they sprout in the spring. It’s easy and it creates strong seedlings ready to be planted in the garden straight from the container without needing to harden off.
What it isn’t: winter sowing doesn’t help seeds germinate early, like you would with indoor seed trays and grow lights, and it is not meant for bulbs or tropical seeds.
Why Winter Sow?
- It’s easy and inexpensive!
- It protects tender seedlings from foraging animals or being washed away.
- Automatically cold-stratifies seeds that require a cold period without the need to refrigerate before planting.
- Winter sown seedlings are stronger and don’t need to be hardened off before planting from the container into the ground.
Winter Sowing Begins After the Winter Solstice December 21st
It’s important to note that containers shouldn’t be assembled and put outside until AFTER December 21st. The reason why is because if you do it before that date you run the risk of the seeds germinating too early and seedlings dying as the weather turns colder and the daylight runs shorter. Since December 21st is the winter solstice, after that point is when daylight begins lengthening again, which is beneficial for newly sprouted seeds. Certainly you can prep containers before this date, but you need to wait to plant seeds and set outside until after the winter solstice.
Supply List
We’ll go into more detail about each of these topics below, but here’s a basic list of what you’ll need to get started.
- Seeds
- Containers (rinsed and cleaned as needed)
- Soil
- Water source
- Tape (painter’s tape or duct tape work best), zip ties, string, twine, or other method to close containers or hold lids on securely; rubber bands are not recommended because they deteriorate in the elements
- Oil-based markers; while labeling is optional, if you don’t like surprises, know that regular permanent markers will wear off from the elements
- Tool to cut containers, such as box cutter, utility scissors, hand saw, soldering gun; puncture tool to cut drainage holes such as a screwdriver, hot glue gun, soldering gun, or a drill for thicker materials
- Clear covers for any containers that don’t have a top
Choosing Seeds
The short answer to the question “What can I winter sow?” is any seed that isn’t tropical. But it’s true that some seeds winter sow better than others, such as:
- Seeds that need cold-stratification such as sweet pea, milkweed, lupine, Echinacea, scabiosa, perennial sunflowers, black-eyed susan, larkspur, lavender, hyssop, catmint, dara, and others that require a cold period.
- Native seeds and those that grow naturally in the wild.
- Anything that re-seeds naturally in your own or your neighbor’s garden.
- Cool weather vegetable seeds like lettuce do very well, but any vegetable can be sown.
Understand that figuring out which seeds work best may take some trial and error. Let’s say the first year you plant 10 containers and only 6 of them germinate—this doesn’t mean you’re a failure as a gardening winter sower. You will learn by experience what works best for you.
Winter sowing is for planting seeds, not bulbs. Tulips, daffodils, garlic, allium, and other bulbs should not be planted to winter sow because they will rot in the container. However, allium, garlic, and onion seeds will be fine.
Seeds that do well with winter sowing include (not a comprehensive list):
Vegetables
- Allium family (onions, shallots, garlic)
- Artichokes
- Beans
- Beets
- Brassica family
- Carrots
- Celery
- Chard
- Eggplant
- Leafy Greens
- Lettuces
- Okra
- Parsnip
- Peas
- Peppers
- Radishes
- Spinach
- Tomatoes
Herbs
- Anise
- Basil
- Bee Balm
- Borage
- Chamomile
- Chervil
- Chives
- Cilantro
- Dill
- Lemon Balm
- Lovage
- Mint
- Oregano
- Parsley
- Rosemary
- Rue
- Sage
- Summer Savory
- Sweet Marjoram
- Tarragon
- Thyme
Hardy Annuals
- Calendula
- Celosia
- China aster
- Cornflower
- Cosmos
- Flax
- Larkspur
- Nasturtiums
- Nigella
- Pansy
- Petunia
- Poppy
- Snapdragon
- Statice
- Stock
- Strawflower
- Sunflower
- Sweet alyssum
- Sweet pea
- Toadflax
- Valerian
- Zinnia
Perennials
- Aster
- Astilbe
- Balloon Flower
- Bee Balm
- Bellflower
- Blanket Flower
- Blazing Star
- Blue Fescue
- Broom
- Butterfly Weed
- Candytuft
- Carnation
- Catmint
- Chrysanthemum
- Columbine
- Coneflower
- Coreopsis
- Cranesbill
- Creeping Thyme
- Daisy
- Delphinium
- Dianthus
- English Daisy
- False Indigo
- Foxglove
- Geum
- Helenium
- Helleborus
- Hollyhock
- Hosta
- Joe-Pye Weed
- Jupiter’s Beard
- Lamb’s Ears
- Leadwort
- Lupine
- Pampas Grass
- Penstemon
- Phlox
- Pincushion Flower
- Plumbago
- Primrose
- Rudbeckia
- Salvia
- Verbascum
- Veronica
- Yarrow
Tree seeds work, too! It can be fun to join seed exchanges for harder to find or specialty seeds.
Choosing Containers
Re-using containers is one of the best things about winter sowing, partly because it’s inexpensive, but also because it’s re-using containers that otherwise end up in the trash after just one use.
Container requirements:
- Light needs to be able to reach the seeds and seedlings (some seeds require light to germinate), so either your containers or their lids need to be clear, or at the least transparent (allows some light through, like most milk jugs). Opaque containers don’t allow any light to pass through and can only be used if you cut windows into them.
- It must hold at least 3–4” of potting soil in the bottom and have enough head space for the seedling to sprout and grow.
- Consider the size of what you will be sowing. For example, there are different size requirements for poppies verses cucumbers. You could plant 20 poppies in the same container that can hold one cucumber.
- Small containers dry out quickly so should be avoided—unless grouped in containers like a tote where they can maintain moisture.
- Remove labels if possible, but it’s fine to leave as long as light comes through.
- All containers must have drainage, which can be added if they don’t already have it.
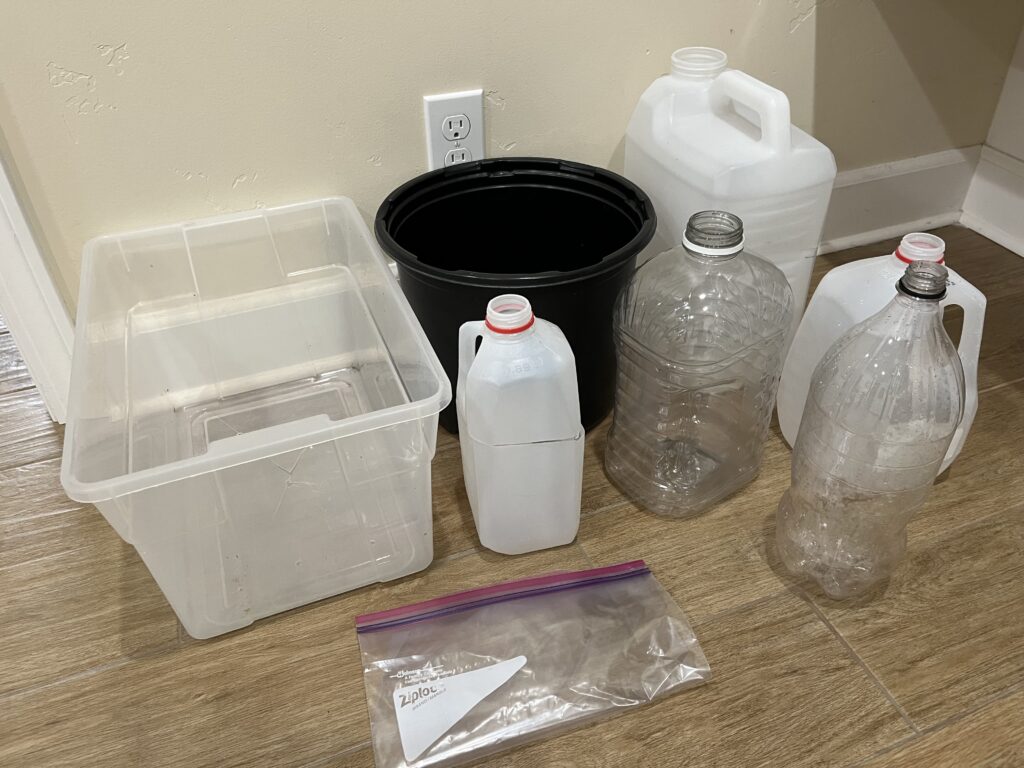
Container ideas:
- Clear tote (with a clear lid)
- Ziplock bag
- Milk jug
- Juice container
- Litter jug
- Soda/water bottle
- Pot
- Drink cup
- Bucket
- Food container
- Foil pan with clear raised lid
If using a pot or other open-top container, you can cut a cover to size using:
- Vinyl yardage purchased at fabric store
- Clear curtain
- Plastic sheeting (such as for painting)
- Clear shower cap
Choosing Soil
Any type of potting medium works for winter sowing, even the kind with fertilizer added to it. Use whichever brand you prefer. Some potting soil contains water-retentive crystals and are fine to use, especially if you live in an arid region, but may promote algae or mold if your climate is wet or humid.
Don’t use:
- Potting soil labeled as ‘weed free’ because they contain chemicals that prevent germination or will kill seedlings.
- Dollar store soil is often low quality and is not recommended.
- Garden soil or top soil—using soil from your yard will be too heavy for the seeds to easily germinate, will contain weed seeds, and are more likely to mold.
- Straight compost—using only compost as your growing medium may burn seedlings or dry out too fast.
Preparing Containers and Planting Seeds
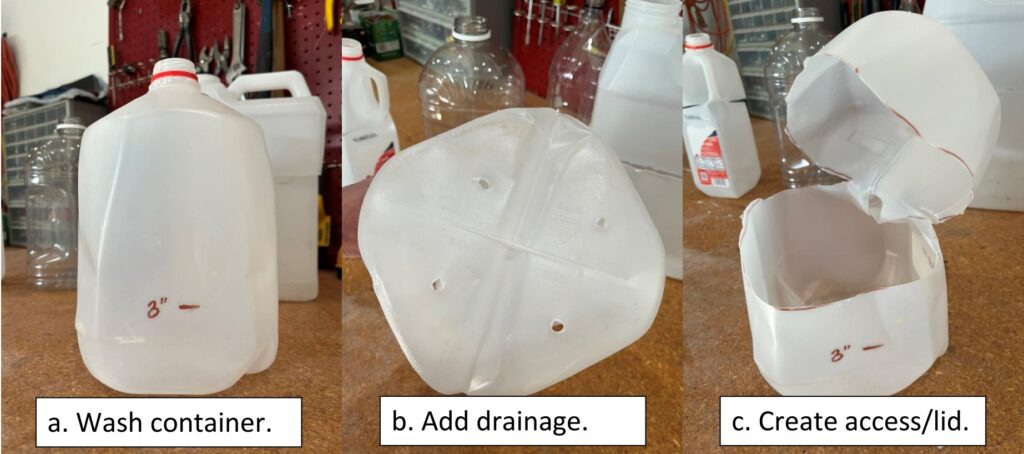
1. Prepare your container:
- Wash your container if needed. If it had soil in it before, consider using Dawn dish soap or diluted bleach to kill any residual bacteria or insects/eggs.
- Create drainage using a sharp tool, soldering iron, or hot glue gun.
- Cut the container opening using kitchen shears, box knife, soldering iron, or saw. Remove the cap if there is one to allow water and air into the container once it’s closed
- (Optional) Add a liner that allows water to freely drain to any pots with large drainage holes to prevent dirt from falling out. Here we use coffee filters.
2. Sow seeds. To determine how many seeds to sow consider:
- How many seedlings you are trying to grow.
- The size the seedlings will be when you plant them in the ground, or how much head room the seedling needs.
- The size of the container you are using.
3. Add potting soil. The soil can be watered before or after adding to the container. Make sure the soil is thoroughly saturated and that the container is draining the water completely.
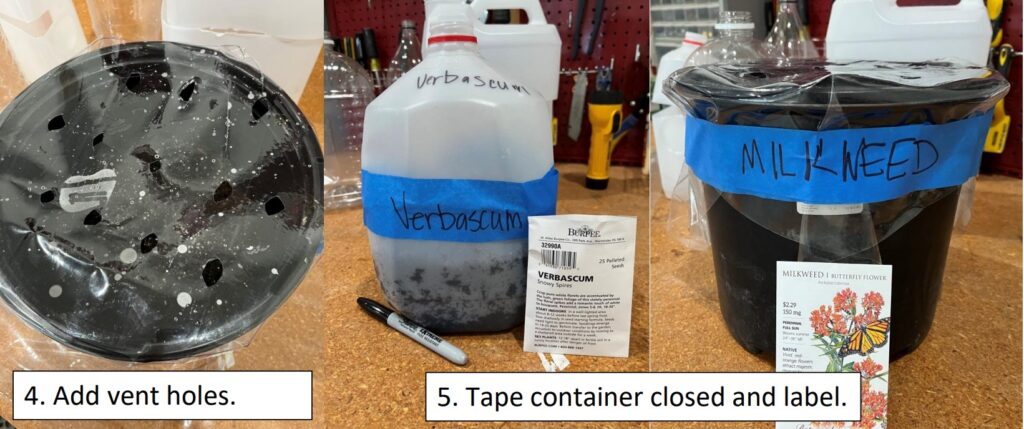
4. If using a separate cover, such as with pots or totes, add vent holes. This is makes water and air available to the seedlings. Here we used vinyl yardage cut to size and added holes to vent. If using a clear tote made of thick plastic you may need to use a drill or soldering iron to create holes to the lids
5. Tape container closed (or use zip ties, twine, etc) and label using the method of your choice.
Set Outside and Maintain
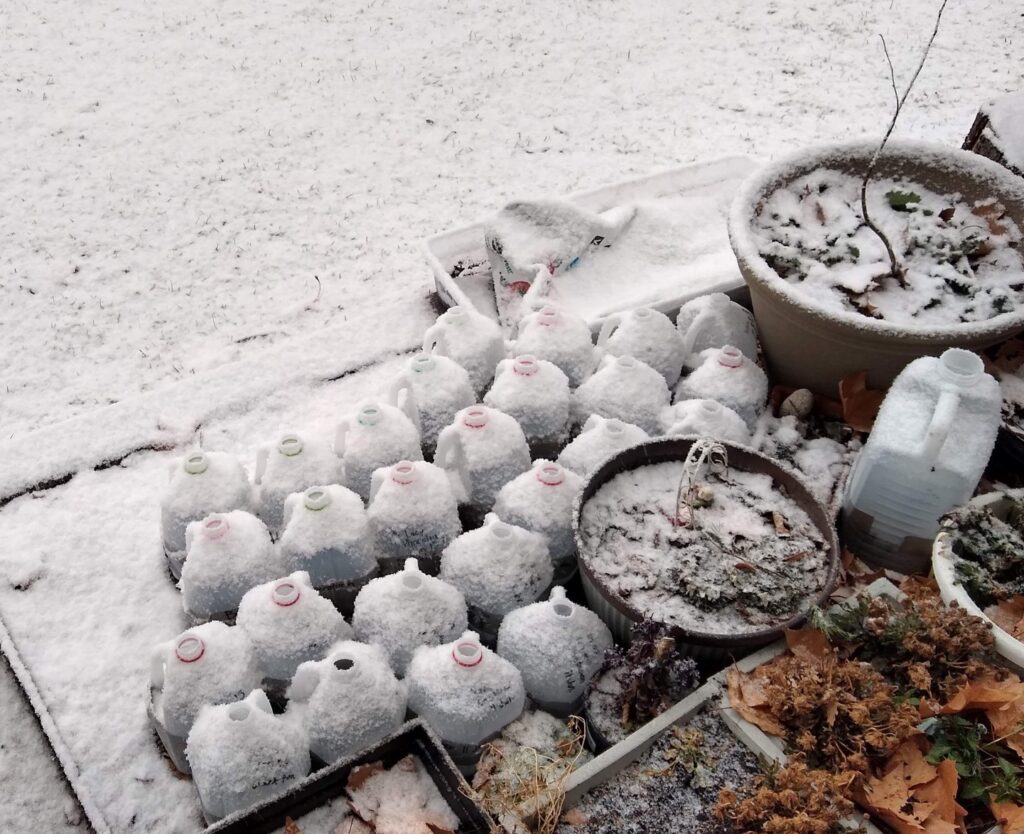
Yes, now put the containers outside after December 21st. You might be concerned about your little seeds and think they need more protection. They don’t. Consider how plants re-seed themselves just fine and they’re out in the elements all winter long! This exposure to elements is exactly what they need, and when they’re ready, they’ll begin to germinate. Patience is necessary with winter sowing so don’t give up!
Make sure the location you choose is where containers will be safe from pets, critters, and mounds of moved snow. They don’t have to be in full sun.
It’s important that they don’t dry out! They get watered by rain and snow, but wind will dry them out, so make sure you keep them close to a water source for easy watering. If you live in a dry environment, such as the southwestern U.S. desert, check your containers a few times a week to make sure they don’t dry out. You can water from the bottom using a tray or wading pool to prevent seeds from getting disturbed by overhead watering. As long as the soil stays damp, they’ll eventually germinate, even if it’s not when you think they will. Remember, this method doesn’t make seeds germinate earlier, like with indoor lights. Instead you are protecting seedlings until you can plant them in the landscape, and they will germinate at their normal time.
In the spring if the air temperature is more than 50 but they aren’t ready to be transplanted, you can move them to shade and increase venting. The other option is to open the containers during the day and close at night, but that’s more work and they dry out faster. It depends on what works best for you.
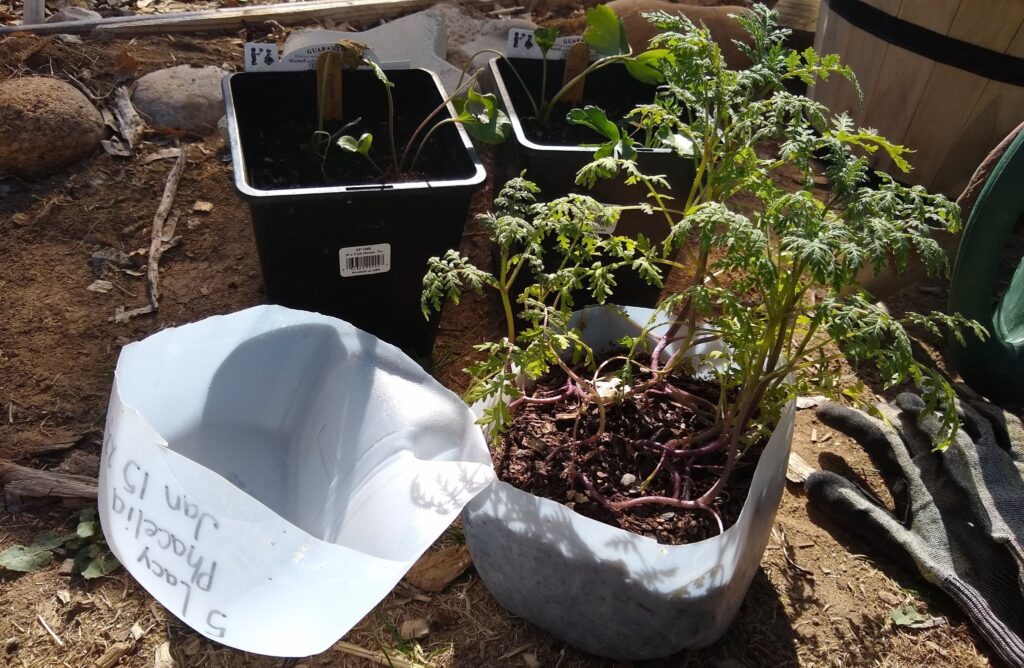
Transplant Your Seedlings
Once your containers have sprouted the process to plant your seedlings is simple:
1. Keep the container watered if you don’t have rain and until you’re ready to transplant.
2. Once the seedlings have 2 sets of ‘real’ leaves, they are ready to plant, even if the evening temperature freezes. These seedlings germinate when they’re ready and are hardy enough to not needing hardening off. You shouldn’t need to cover even if there is a risk of frost after transplanting, but you can cover if you choose.
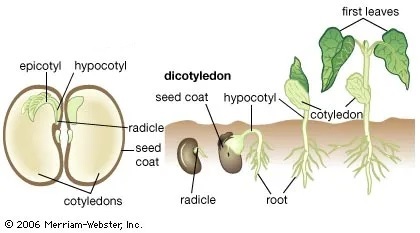
The first set of leaves your seedlings put out are called Cotyledons and are sometimes referred to as ‘seed leaves’ because they are actually part of the seed or plant embryo. After these leaves emerge, the ‘real’ leaves grow. This is the indication that the containers are ready to transplant. You can do it now or wait until later when it’s more convenient timing for you. But understand that they will do better once in the ground.
3. Open the container top and push on the bottom of the container or scoop out the soil.
4. Separate the seedlings into ‘hunks’ to disturb the fewest roots possible and keep soil around the roots. The seedling roots may have grown together during their time in the container. This is normal! You can separate into hunks about 2”x2” using a knife or your fingers. Another method is to use a spoon and scoop out larger seedlings.
It’s That Easy
And that’s it! You may think there’s more to this method, but it’s really very simple. Using this method saves money and there’s no remembering where you sowed seeds straight into the ground the previous fall. Instead, you can plant the seedlings directly in the spring and know where everything is. And since the seedlings are larger and stronger, they are less at danger of being eaten by birds or bugs. The ability to garden in the winter without being in the cold for extended periods also makes winter sowing an attractive hobby.
Probably the best thing about winter sowing is that you often end up with more than you can use! This is a great way to share to with friends, neighbors, and local community gardens who would appreciate extra plants.